A Comprehensive Patient Guide to Dental Inlays and Onlays
If you have a cavity or damaged tooth that’s too big for a standard filling but not severe enough for a full crown, your dentist may recommend a dental inlay or onlay. Inlays and onlays are custom-made restorations (sometimes called “partial crowns”) used in restorative dentistry to repair moderate tooth damage while preserving as much healthy tooth as possible. This article will help you understand what inlays and onlays are, when they’re recommended, how the procedure works, and how they compare to other restorations like fillings and crowns. We’ll also cover what to expect during and after treatment, plus common myths and questions, so you can feel confident about your dental care.
What Are Dental Inlays and Onlays?
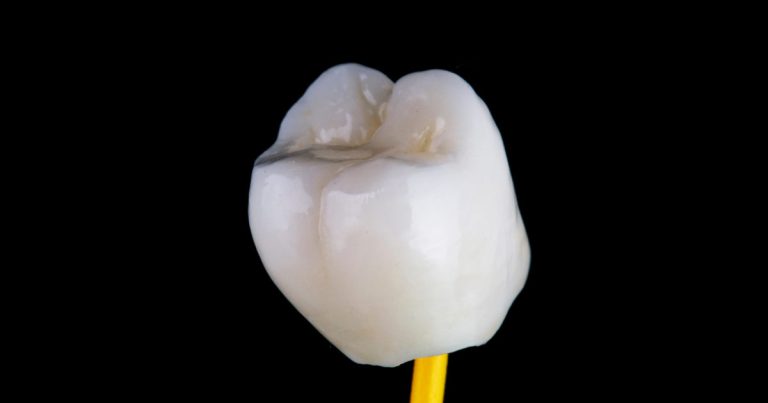
Dental inlays and onlays are types of indirect fillings – meaning they are fabricated outside the mouth (in a dental lab or with in-office CAD/CAM technology) and then bonded to the tooth. They restore a portion of a tooth’s chewing surface that has been damaged by decay or injury:
- Inlays fit into the grooves of a tooth (the indented top surface) between the cusps. They fill cavities or areas of damage within the tooth’s cusps. An inlay essentially fills a space similar to a traditional filling, but it is a single solid piece custom-made to fit that space precisely.
- Onlays cover more area than inlays. In addition to filling the area between the cusps, an onlay extends over one or more cusps (the pointed parts of the tooth). Because onlays cover the tooth’s peaks, they are sometimes called onlay restorations or partial crowns. An onlay can rebuild a tooth that has a larger portion broken or decayed but still doesn’t require a full crown.
In simpler terms, think of an inlay as repairing the “valleys” of your tooth, while an onlay repairs the “peaks” as well. Both are custom-molded to your tooth’s exact shape, ensuring a snug fit. They are typically made from strong, durable materials such as porcelain, gold, or high-strength resin. Porcelain dental inlays and onlays are especially popular today because they are tooth-colored and blend in naturally, while still being very strong.
How They Differ from Fillings:
A regular filling is a soft material placed directly into a cavity and hardened (for example, composite resin that is cured with a light). Fillings are best for small cavities. Inlays and onlays, by contrast, are pre-made outside the mouth (hence “indirect”) from a solid material and then cemented in. This makes them more durable and wear-resistant than a large filling. Inlays/onlays also have very precise fit and seals, since they are crafted to exactly match the prepared cavity shape.
How They Differ from Crowns:
A crown (or “cap”) covers the entire visible portion of the tooth. Crowns are used when damage or decay is so extensive that most of the tooth needs protection or reinforcement (for instance, after a root canal or a major fracture). Inlays and onlays are more conservative – they only replace the damaged parts of a tooth rather than covering the whole tooth. This means to place an inlay/onlay, the dentist can preserve more of your natural tooth structure, removing less healthy enamel compared to a crown preparation. In essence, an onlay or inlay restores the tooth from within or on top, whereas a crown replaces the whole external tooth structure. Because of this, inlays and onlays offer a middle ground option: they provide more strength and coverage than a filling, but are less drastic than shaving the tooth down for a crown.
Who Might Need an Inlay or Onlay?
Inlays and onlays are recommended in specific situations where a filling would not be sufficient but a crown would be overly aggressive. You might be a candidate for an inlay or onlay if:
- Moderate Decay or Cavity Size: You have a cavity that is too large for a simple filling, but the tooth is otherwise intact. For example, if more than about 1/2 of the tooth’s width is decayed or a big old filling needs replacement, a regular filling might not hold up well. An inlay/onlay can provide a stronger solution for these mid-sized cavities.
- Large, Failing Fillings: You have an existing large filling (or multiple fillings in one tooth) that is breaking down, leaking, or cracking the tooth. Inlays/onlays can replace these big fillings and reinforce the tooth, where just refilling might not last.
- Cracked or Fractured Tooth (Partial): Part of your tooth has cracked or broken off — for instance, a cusp chipped due to biting something hard — but there is still a solid amount of healthy tooth remaining. An onlay can be used to rebuild the missing piece and cover the crack, preventing it from spreading, without needing to crown the whole tooth.
- After Root Canal (in some cases): If a back tooth had a root canal and still has a lot of sound structure left, a dentist might choose a strong onlay to cover the access hole and any weakened cusps, instead of a full crown. (Many root-canaled teeth do get crowns, but an onlay is an option if appropriate.)
- Cosmetic Improvements to Large Damage: In some cases, an old metal filling or area of damage on a visible tooth could be replaced with a tooth-colored porcelain inlay/onlay for better appearance and strength.
Essentially, an inlay or onlay is ideal for teeth that are in-between: the damage is more than a simple filling can reliably fix, but the tooth isn’t damaged enough to require a full crown. Dentists often call these “conservative” restorations because they fix the problem while keeping as much of your natural tooth as possible.
Signs You May Need an Inlay or Onlay
How do you (or your dentist) know that a filling won’t cut it, and an inlay/onlay is needed? Only a dental exam and X-rays can confirm the best restoration, but there are some common signs and scenarios that point toward an inlay/onlay solution:
- Pain or Sensitivity When Biting – If you feel a sharp pain or zing in a specific tooth when you bite down or chew, it could mean there’s a crack or a large cavity. Often, a cracked tooth syndrome (small fracture) might need an onlay to hold the pieces together.
- Visible Crack or Large Cavity – You might actually see a crack line on the chewing surface of a molar, or a part of the tooth looks broken. Or perhaps you notice a large hole or dark area of decay in a tooth. When the damage is clearly larger than a tiny spot, it likely requires more than a filling.
- A Filling Keeps Failing – If you have a tooth where a filling has fallen out more than once, or a new filling still hurts or doesn’t feel right, it might be because the cavity is too large for a simple filling. That tooth may need the stability of an inlay or onlay.
- Piece of Tooth Broke Off – Maybe while eating something hard, a chunk of your tooth came off (commonly a cusp of a molar). If the remaining tooth is strong enough, an onlay can often replace the missing piece. You might notice a rough or jagged area on the tooth or food getting stuck in a new hole.
- General Tooth Pain with Large Old Fillings – A tooth that has a big, older filling that begins to ache or have hairline cracks around it could be telling you that it’s time for a better restoration. An inlay/onlay can swap out that old filling and give new life to the tooth.
Remember, you won’t be determining on your own that “I need an onlay” – but these signs are good reasons to see your dentist promptly. The dentist will examine the tooth and take X-rays to see how deep and wide the damage goes. If the tooth can be saved without a crown, an inlay or onlay is often the treatment of choice.
Consultation and Diagnosis: What to Expect
At your dental visit, if you have a tooth that might need more than a filling, the consultation and diagnostic process will involve a thorough examination:
- Dental Exam: The dentist will visually inspect the troubled tooth and the surrounding teeth. They’ll check for cracks, the extent of any cavity, or failing restorations. Often they will use special tools to detect any soft decay or to see if parts of the tooth are weakened.
- X-Rays or 3D Scans: An X-ray of the tooth is usually taken to see how far the decay extends and to ensure the roots are healthy. In modern offices, a handheld scanner might also be used to create a digital model of your tooth. These images help determine if an inlay/onlay is suitable or if the tooth might need a crown or other treatment.
- Discussion of Options: If the dentist concludes that a dental inlay or onlay is appropriate, they will explain why it’s recommended over a filling or crown in your case. They’ll also discuss what the procedure involves. If multiple teeth have issues, they’ll create a treatment plan possibly combining different restorations.
- Material Choices: You may have a say in the material used for your inlay/onlay. The common materials are porcelain, composite resin, or gold. The dentist will recommend what’s best based on the tooth’s location and your preferences:
- Porcelain or Ceramic: Tooth-colored, great aesthetics, very durable – commonly used for visible teeth or anywhere for a natural look.
- Composite Resin: Also tooth-colored, usually used for smaller inlays or if cost is a concern; not as hard as porcelain but can be done in some cases.
- Gold or Metal Alloy: Extremely durable and long-lasting (gold inlays can last decades), but bright metallic appearance – often chosen for back molars where strength is crucial and appearance isn’t a concern.
- Treatment Planning: The dentist will outline the number of appointments needed (typically two visits for a lab-made inlay/onlay), the timeline, and any preparatory steps. If you have any active pain or infection, they’ll address that (for example, if the tooth’s nerve is affected, a root canal might be needed before the restoration). They will answer your questions so you know what to expect.
By the end of the consultation, you should know why an inlay or onlay is being recommended, what material will be used, and have your appointments scheduled. This initial visit is usually just an exam and planning – the actual procedure often happens at the next appointment (unless the dentist has time and you’re ready to do the prep right then).
The Inlay/Onlay Procedure: Step-by-Step
Getting an inlay or onlay is very similar to getting a crown, but a bit less intensive. It usually spans two appointments (for a lab-fabricated restoration) or sometimes can be done in one day if the office uses same-day CAD/CAM technology. Here’s a step-by-step overview of what happens:
First Appointment – Preparation and Impression:
- Anesthesia: The dentist will numb the affected tooth and surrounding area with local anesthesia. This ensures you won’t feel pain during the procedure. (If you’re anxious, you can discuss sedation options, but for most people a simple numbing shot is all that’s needed.)
- Removing Decay or Old Filling: The dentist uses a drill to remove all the decayed areas of the tooth and/or any old filling material. They will also clean the tooth thoroughly. The goal is to eliminate damaged tissue and shape the cavity into a stable form.
- Tooth Preparation: Unlike a small filling, the space for an inlay/onlay may need specific shaping – slightly extended walls with no undercuts – so that the lab-made piece can fit in snugly. If an onlay is being done, the dentist will trim away the damaged cusps and form a platform or outline for the restoration to sit on. Care is taken to preserve as much healthy tooth as possible.
- Impression (Mold) or Digital Scan: Once the tooth is prepped, the dentist will capture the exact shape of the area. This can be done with a traditional impression (you bite into a soft putty or the dentist fills a tray that sets around your tooth) or with a digital scanner that creates a 3D image. This “map” of your tooth is sent to a dental lab where the inlay/onlay will be crafted, or it’s used by an in-office milling machine for same-day restorations.
- Temporary Protection: If your inlay/onlay will be made by an outside lab, the dentist will mix up a temporary filling or create a temporary onlay to cover the prepared area. This protects your tooth over the next week or two and keeps you comfortable (so there’s no sensitive exposed dentin). The temporary won’t be as sturdy as the final product, so you’ll be advised to chew carefully on that side and avoid very hard or sticky foods that could dislodge it.
Now you’ll go home and wait for your custom restoration to be ready. The impression is sent to a lab, where skilled technicians or computer-aided machines will create the inlay/onlay from the chosen material. This typically takes about 1–2 weeks. In the meantime, treat your temporary with care and maintain normal oral hygiene (brushing gently around it and maybe avoiding flossing directly through that area if the floss catches the temp).
Second Appointment – Placement of the Inlay/Onlay:
- Remove Temporary: The dentist will pop out the temporary filling or onlay. They might numb the tooth again, but often placing an inlay/onlay is less invasive and may only need minimal or no anesthesia (depending on how sensitive your tooth is).
- Try-In and Fit Check: The new inlay/onlay (from the lab or the milling machine) is tried in your tooth. The dentist will make sure the piece fits precisely into/onto the prepared area. They will check that the contacts with neighboring teeth are good (so floss can pass but the fit is snug) and that your bite is correct when you close your teeth. Minor adjustments can be made by trimming or polishing the restoration for a perfect fit.
- Bonding/Cementing: Once the fit is perfect, the inlay/onlay is permanently attached. The dentist applies a special dental cement or resin adhesive inside the tooth and presses the inlay/onlay into place. For porcelain or composite restorations, they often use a bonding resin that is cured with a blue light, which bonds the restoration to the tooth structure very tightly. Excess cement is cleaned away.
- Finishing Touches: The dentist will polish the inlay/onlay and the margins so it feels smooth and natural. They will double-check your bite and make any final adjustments so that you bite down evenly and comfortably on the new restoration.
After these steps, your tooth is fully restored. The inlay or onlay should fit so well that you might run your tongue over it and hardly notice the transition between the restoration and your natural tooth. The color will be matched to your tooth (if porcelain/composite), making it look and feel like part of the tooth.
Same-Day Inlays/Onlays:
Some modern dental practices offer CAD/CAM (computer-aided design and manufacturing) technology, like CEREC, which can produce a ceramic inlay or onlay right in the office during a single visit. In that case, steps 4 and 5 of the first appointment are a little different:
- After preparing the tooth, the dentist takes a digital scan. Instead of sending it to an outside lab, a computer designs your restoration on the spot.
- A milling machine carves the inlay/onlay from a ceramic block in about 15-30 minutes. You wait in the office (sometimes you can even watch the milling process or relax during this time).
- The dentist then bonds the new piece in place in the same visit, skipping the need for a temporary and a second appointment.
Not every office has this technology, and not every case can be done same-day, but it’s worth asking if you’re interested in a one-visit solution.
How Long Does the Procedure Take (and How Many Visits)?
Number of Appointments:
Typically, a lab-made inlay or onlay requires two visits as described above. The time between appointments is often 1 to 2 weeks to allow the lab to fabricate the restoration. If a same-day CAD/CAM onlay or inlay is done, it can be completed in a single visit.
Length of Appointments:
For a two-visit case: – The first (preparation) appointment usually takes about 60 to 90 minutes. This includes numbing the tooth, drilling out decay, taking impressions, and making a temporary. The exact time depends on how large or complex the cavity is – a straightforward inlay prep could be closer to an hour or less, while a more complicated onlay might take a bit longer. – The second (cementation) appointment is often shorter, around 30 to 60 minutes. If the fit is great and minimal adjustments are needed, it could be done in half an hour. If more tweaking is required, it might be closer to an hour. This appointment usually is quicker since most of the hard work was done in the first visit.
For a same-day restoration, the total time might be around 2 hours (give or take) in one stretch. Much of that time you may be waiting for the milling machine to make the piece, but overall it’s longer than a single filling appointment because of the design and fabrication steps. The benefit is you don’t need to come back another day.
From Start to Finish:
If you’re doing the two-visit approach, expect the whole process (from initial prep to final placement) to span about one to two weeks. During that period you’ll have a temporary in place. If you experience any issues with the temporary (like it comes loose), your dentist can re-cement it, but that’s uncommon if you’re careful.
It’s always a good idea to clarify with your dentist how many visits and how much chair time is needed for your specific case. They can give you a more precise schedule based on your treatment plan.
Does Getting an Inlay or Onlay Hurt? (Pain Management & Comfort)
One of the top questions patients have about any dental procedure is: will it hurt? The good news is that getting an inlay or onlay should not be painful. Dentists take many steps to ensure your comfort:
- Local Anesthetic: Just like with a filling or crown, the dentist will inject a local anesthetic (such as lidocaine) around the tooth. This numbs the tooth, gum, and surrounding area completely. You might feel a slight pinch from the needle at first, but after that, the tooth goes numb and you shouldn’t feel sharp pain during the procedure. You will likely still feel pressure, vibration, or water from the drill, but not pain.
- During the Procedure: As the dentist removes decay or shapes the tooth, you remain numb. If at any point you start to feel sensitivity, you can alert your dentist and they can administer more anesthetic. Dentists are very mindful of patient comfort; modern high-speed drills and techniques also help make the process quicker and smoother.
- Sedation Options: If you’re very anxious about dental work, many offices offer additional sedation like nitrous oxide (laughing gas) or oral sedation pills to help you relax. For an inlay/onlay, these aren’t usually necessary, but they are available if needed to keep you comfortable and calm.
- Temporary Discomfort: After the first appointment when the anesthesia wears off, you might feel some mild soreness in your gum or jaw (from keeping your mouth open). The injection site on the gum could be a little tender. Generally, any discomfort is minor and goes away in a day or so. Over-the-counter pain relievers (ibuprofen or acetaminophen) are typically sufficient if you feel achy. Many patients feel no significant pain after, just maybe a bit “worked on.”
- Second Appointment: Often the second visit (placing the inlay/onlay) involves minimal drilling (mostly just cleaning the cement off or slight adjustments). You may or may not need to be numbed for this part. If the dentist needs to adjust the bite or do minor polishing, they might do it without numbing since it’s usually painless. However, if you’re nervous or if the tooth is a bit sensitive, they can numb it again. Bonding the restoration shouldn’t hurt; you’ll feel some pressure as it’s seated.
After the Procedure:
When the final restoration is in, you’ll have a fully functioning tooth again. It’s normal to have a little sensitivity to hot, cold, or biting pressure for a few days up to a couple of weeks as the tooth settles down. This is usually mild and improves gradually. Any lingering sensitivity can often be managed with a sensitive-teeth toothpaste for a short while. If you do experience any sharp pain or something that doesn’t feel right (like the bite being off), you should contact your dentist to have it checked – an adjustment might be needed.
In summary, the process of getting an inlay or onlay is generally no more uncomfortable than getting a regular filling. With proper numbing, you should be pain-free during treatment. Dentists will ensure you’re at ease, and most patients handle it very well.
Recovery After Receiving an Inlay or Onlay
One of the advantages of inlays and onlays is that the recovery is usually quick and easy. Since this procedure is minimally invasive (compared to something like an extraction or implant surgery), you can expect a smooth post-treatment experience:
- Numbness Wearing Off: After your appointment, the local anesthesia will take a couple of hours to wear off. During this time, be careful not to bite your cheek or tongue (they will be numb too). It’s wise to avoid chewing until feeling returns, to prevent accidental bites or burns (if you eat hot food without realizing it’s hot).
- Post-Procedure Sensations: It’s normal for the gum area around the tooth to feel a little sore or tender for a day or two, especially if a rubber dam clamp or other tools were used on your gum. If an onlay was placed, the tooth may have minor soreness because a bit of the bite was adjusted. This should be mild.
- Sensitivity: Your tooth might be sensitive to cold or heat initially. This sensitivity typically diminishes over several days. If a temporary was recently removed, the tooth might have been a bit sensitive under it, and now adjusting to the final restoration it should gradually calm down. Using a desensitizing toothpaste can help if needed.
- Bite and Comfort: Pay attention to how your bite feels once the numbness is gone. Your teeth should come together comfortably. If the inlay/onlay is even slightly too high, you might notice yourself biting on it first or discomfort when clenching. This can happen because even a tiny difference in height is noticeable in the mouth. If you sense this, call your dentist – a quick adjustment can fix a high spot and relieve the pressure. It’s better not to “just get used to it,” since a high bite can cause soreness or even damage the restoration over time.
- Chewing and Eating: After a permanent inlay or onlay is placed and the numbness is gone, you can return to normal eating. These restorations are strong, so you can chew food normally. However, it’s prudent to ease in with somewhat softer foods on that tooth for the first day. Avoid super hard or sticky items for the first 24 hours to ensure the cement fully sets and the restoration is secure.
- Pain Management: Most patients don’t need any pain medication after an inlay/onlay aside from maybe a dose the first evening if the tooth is a bit achy. Over-the-counter ibuprofen or Tylenol is usually more than enough. If you do experience something like gum soreness, a warm saltwater rinse can soothe the area (1/2 teaspoon of salt in a glass of warm water).
- Healing of Tooth: There isn’t exactly “healing” needed like in a surgical procedure, but your tooth might take a short time to get used to the new restoration. The nerve inside the tooth may have been irritated from the drilling and bonding processes, so slight sensitivity is the tooth’s way of calming down. This should improve day by day. If the tooth had very deep decay, the dentist would have placed a base or liner to protect the pulp; as long as you don’t have spontaneous severe pain, everything is likely fine and settling normally.
In general, you can go back to work or your regular activities right after the procedure. There’s no significant downtime. The main “recovery” advisories are just to be mindful of the numbness and be gentle on the tooth for a short time. If you follow your dentist’s aftercare instructions, you’ll likely forget that you even had the procedure done within a day or two, aside from marveling at how your tooth looks and feels good as new!
Aftercare and Maintenance for Inlays/Onlays
After your tooth is restored with an inlay or onlay, taking care of it is very similar to caring for any of your natural teeth or other fillings. Here are some guidelines to ensure your restoration lasts and your tooth stays healthy:
- Brush and Floss Normally: Maintain good oral hygiene by brushing at least twice a day with a fluoride toothpaste and flossing once a day. Pay special attention to the area around the inlay/onlay. It’s important to clean at the margins (where the restoration meets the tooth) to prevent plaque buildup. Flossing is key to keep the edges between the teeth clean. The restoration itself cannot get a cavity, but the exposed tooth around it certainly can if not kept clean.
- Avoid Extremely Hard Chewing: While inlays and onlays are quite durable, no dental work is indestructible. Avoid chewing on very hard objects that could crack the restoration or the remaining tooth. This includes things like ice, hard candy, popcorn kernels, or even pens/pencils (don’t chew on those). Likewise, don’t use your teeth as tools to open packages or caps. If you grind your teeth at night (bruxism), talk to your dentist – they may recommend a nightguard to protect both your natural teeth and the restoration from excessive forces.
- Be Cautious with Sticky Foods: Very sticky candies (taffy, caramels, gummy candies) can sometimes pull at restorations. An inlay/onlay that’s properly bonded shouldn’t pop out, but it’s still wise to be gentle with super sticky treats. If you do indulge, chew them on teeth without extensive restorations if possible.
- Regular Dental Checkups: See your dentist regularly (usually every 6 months for a checkup and cleaning, unless advised otherwise). During exams, the dentist will inspect the inlay/onlay to ensure it’s intact and sealed well. They’ll also take periodic X-rays to check that no decay is sneaking in around or under the edges. Professional cleanings will keep your gums healthy around that area too.
- Fluoride and Toothpaste: Using a fluoride toothpaste or rinse can help strengthen the tooth around the margins of the restoration. In some cases, dentists may prescribe a high-fluoride toothpaste or recommend an over-the-counter fluoride rinse if you are cavity-prone. This extra fluoride can protect the borders of the inlay/onlay where decay could potentially recur if hygiene slips.
- Watch for Changes: Keep an eye (or tongue) on the tooth. If you ever feel the inlay/onlay has loosened or there’s a catch when flossing that wasn’t there before, get it checked. Also note any new sensitivity. These restorations usually feel seamless, so any roughness or movement could indicate a problem that needs attention.
- Polish if Needed: Over years, the shine on a resin or porcelain restoration might dull slightly or get minor staining at edges. During your routine visits, dentists can often polish the inlay/onlay to refresh its surface. Porcelain is quite stain-resistant (another plus), so staining is usually minimal unless there’s a tiny gap.
With good care, an inlay or onlay can last many years – often 10-15 years, and in some cases much longer (some gold ones even 20-30 years). By keeping up with oral hygiene and dental visits, you’ll protect your investment and keep that tooth strong and problem-free.
When to Contact Your Dentist Afterward
Most patients have a trouble-free experience after getting an inlay or onlay. However, it’s important to know when something isn’t quite right so you can get back in to see your dentist for an adjustment or fix. You should contact your dentist if:
- Your Bite Feels Off: Once you’re no longer numb, if you feel like you hit that tooth first when you bite down or there’s any discomfort when closing your jaws together, the inlay/onlay may be a tad high. An uneven bite can cause tooth soreness or jaw pain, and it can also put extra stress on the restoration. This is usually easily corrected with a quick adjustment (smoothing down the high spot).
- Persistent Pain or Sensitivity: Some sensitivity is normal for a short time, but if you have pain that doesn’t improve or actually worsens after a week or two, let your dentist know. In rare cases, a tooth that was very close to the nerve might develop inflammation (pulpitis) after a restoration, which could require further treatment like a root canal. Or, there might be an area that wasn’t fully sealed and is causing sensitivity. Don’t ignore intense or throbbing pain.
- Restoration Feels Loose: If you have the sensation that the inlay/onlay is moving or not attached firmly (you might feel a slight rock or movement when chewing or notice the margins are not flush), call the dentist right away. While it’s uncommon for a bonded restoration to come loose, it can happen if, for example, moisture interfered with the bonding or if you bit down on the temporary and cracked some tooth without realizing. A loose restoration can let bacteria in, so it needs to be re-cemented or replaced promptly.
- It Comes Out or Breaks: In the unlikely event the inlay or onlay actually falls out or a piece of it chips off, save the piece if you can and contact the dentist immediately. The tooth will likely be sensitive if exposed. The dentist will need to see you to either bond it back or make a new one. Don’t try to glue it yourself with any household adhesive.
- Continued Rough Edge or Floss Snag: If after placement there’s a spot you just can’t floss or the floss keeps shredding, it could mean a bonding resin excess or edge needs smoothing. Likewise, if your tongue keeps feeling a sharp spot on the tooth days later, it might need a quick polish. These small adjustments can make a big difference in comfort.
- Signs of Infection: Extremely rare for a simple restoration, but if you notice gum swelling, a pimple on the gum, or severe prolonged sensitivity to hot (weeks after placement), it could indicate an underlying issue with the tooth’s nerve. Contact the office for an evaluation to rule out any need for additional treatment.
In summary, don’t hesitate to reach out to your dentist if something doesn’t feel right after the procedure. It’s usually a minor fix. Dentists want you to have a well-fitting, comfortable restoration and a healthy tooth, so they’ll be happy to address any post-op concerns.
Benefits of Inlays and Onlays
Dental inlays and onlays offer several advantages as a restorative option, combining the best aspects of fillings and crowns. Here are some key benefits:
- Conservative Tooth Preservation: Inlays and onlays are designed to save as much of your natural tooth as possible. Unlike a crown that requires significant trimming of the tooth, an inlay/onlay only removes the decayed or damaged portion. Healthy areas are left intact. Preserving more tooth structure helps maintain the overall strength of the tooth and is generally better for long-term oral health.
- Added Strength and Durability: These restorations are very strong. Because they are fabricated from robust materials like porcelain, high-quality composite, or gold, they can withstand chewing forces well. In fact, an onlay can often strengthen a tooth with a fracture by holding it together (acting like an internal splint). Inlays and onlays typically last longer than large direct fillings — often many years or even decades with good care.
- Excellent Fit and Seal: Since inlays/onlays are custom-made for your tooth, they have very precise margins. The dentist bonds them in place, creating a tight seal that helps keep bacteria out. A well-sealed restoration lowers the chance of recurrent decay. The precise fit also means your bite and tooth shape are restored very accurately, which can make the tooth feel natural and easy to clean.
- Aesthetics (Tooth-Colored Options): Today’s porcelain inlays and onlays are highly aesthetic. They are color-matched to your tooth, and porcelain has a translucency similar to enamel, so the restoration is virtually invisible in your smile. Unlike metal fillings or gold, nobody will know you have a restoration. Even composite resin inlays are tooth-colored. This is great for cavities on visible teeth or for people who want their dental work to blend in.
- No Expansion or Shrinkage: Large composite fillings can sometimes shrink slightly when hardened, and metal fillings can expand/contract with temperature, possibly weakening the tooth over time. Inlays and onlays are already cured and solid when bonded in, so they don’t have those issues. This stability can be gentler on the tooth and reduce the risk of leakage or cracks that sometimes happen with big fillings.
- Protects Against Further Decay: By covering the cavity completely and often the cusps (with onlays), these restorations seal off vulnerable areas. Bacteria can’t easily penetrate a well-bonded inlay/onlay, so the treated tooth is less likely to get new decay in that spot. Some studies even suggest that bonding an onlay/inlay can reinforce the remaining tooth and help distribute forces, making the tooth less prone to fracture or future breakdown.
- Comfort and Function: Once placed, an inlay or onlay should feel just like a part of your tooth. There’s no metal taste or edges, and it’s contoured to fit your bite perfectly. Patients often report that chewing feels very natural again, especially if they had an old cracked filling before. This can restore confidence in eating without worry.
- Long-Term Cost Effectiveness: While inlays/onlays can cost more upfront than a filling, their longevity can make them cost-effective over time. A filling that fails or fractures every few years could end up costing more in cumulative repairs or lead to more serious issues. An inlay/onlay that lasts 10-20 years provides a lasting solution, potentially avoiding the need for a crown or more extensive work later.
In short, inlays and onlays offer a balance: they provide much of the strength and protection of a crown but with a conservative approach that keeps your natural tooth structure. They are a trusted, proven solution for extending the life of a damaged tooth while maintaining a natural look and feel.
Risks, Limitations, and Potential Downsides
While inlays and onlays have many benefits, it’s important to be aware of the limitations or drawbacks associated with them. Here are some considerations and potential downsides:
- Not Suitable for Severe Damage: Inlays/onlays are only an option when enough healthy tooth remains. If a tooth is very severely decayed or broken, such that it’s mostly filling and very little actual tooth left, a crown is usually necessary for full coverage and strength. If you attempt an onlay on a tooth that really needed a crown, you risk the tooth cracking further later on.
- Multiple Visits (for Lab-Made): Traditionally, getting an inlay or onlay involves two appointments and wearing a temporary in between. This is less convenient than a one-visit filling. However, as discussed, same-day technology can mitigate this, and even with two visits, it’s typically just a week or two apart. But for some patients, the extra visit is a drawback.
- Higher Cost Than Fillings: Inlays and onlays generally cost more upfront than a simple filling because of the custom lab work or advanced CAD/CAM process. They are also usually billed as a more complex procedure. We’ll detail costs later, but the price can be a few times that of a filling. For patients without insurance or on a tight budget, this can be a factor. That said, they often cost similar or a bit less than a full crown.
- Insurance Coverage Varies: Depending on your insurance plan, an inlay or onlay might be covered at a lower rate or not at all compared to a filling. Some insurances categorize them as “major restorations,” which may come with a higher copay or deductible. This is something to check in advance (we’ll cover insurance in the next section).
- Potential for Sensitivity: After placement, a small number of patients might experience ongoing sensitivity in the tooth. This could be due to the bonding process or the tooth needing time to acclimate. In most cases it resolves, but occasionally further treatment is needed if the tooth pulp becomes irritated. This is not common but is a slight risk whenever a lot of tooth structure is removed or a restoration is bonded.
- Risk of Needing a Future Crown: While inlays and onlays are intended to strengthen the tooth, it’s possible that down the line (many years later) the tooth could still deteriorate or crack to the point of needing a crown. For example, if you have an onlay and then bite into something and crack a different part of the tooth that wasn’t covered, you might end up converting that to a crown. In other words, an onlay doesn’t guarantee you’ll never need a crown on that tooth in your lifetime – but it postpones or prevents it as long as things go well.
- Margins and Decay: The edges (margins) of any restoration are a common spot for plaque to accumulate. If oral hygiene is poor, new decay can form at the margins of an inlay/onlay. If that happens, it can undermine the restoration. This is why aftercare is so crucial. Inlays/onlays themselves don’t decay, but the exposed tooth next to them can. Regular checkups will catch this early if it occurs.
- Loss or Damage: Although rare, inlays and onlays can debond (come loose) or crack. A porcelain onlay, for instance, could chip if you bite an unexpectedly hard object at the wrong angle. Gold is less likely to break (very tough), but could potentially come uncemented if bonding fails. If a restoration pops out, it leaves the tooth vulnerable until fixed. Thankfully, these events aren’t common and proper technique plus materials minimize the risk.
- Aesthetics of Materials: If you choose a gold inlay/onlay for its benefits, the obvious trade-off is esthetics. A gold or metal piece will be visible when you talk or laugh if it’s on an upper tooth, for example. Many people don’t mind gold on back molars (some even like the look), but it’s a consideration. Porcelain and composite look great, but composite can stain slightly over years and isn’t as polishable as porcelain or gold, which could affect appearance long-term.
- Technique Sensitive: The success of inlays/onlays depends on skilled execution. The tooth prep, impression, and bonding all have to be done correctly for a lasting result. If any step is subpar (e.g., the impression had an error, or moisture contaminated the bonding process), it could affect the outcome. This isn’t a patient-controlled factor, but it’s worth noting that not every dentist does inlays/onlays frequently. However, most restorative dentists are well-trained in these, and using a reputable lab also ensures a good fit.
Overall, the drawbacks of inlay/onlay restorations are relatively few and can often be managed or mitigated. For many patients, the advantages outweigh these considerations, especially if the alternative is a much larger procedure. Your dentist will recommend an inlay or onlay only if they believe it’s the appropriate and beneficial treatment for your situation.
Inlays and Onlays vs. Fillings vs. Crowns – How Do They Compare?
It’s helpful to directly compare these three types of restorations since they each have a role in fixing teeth:
- Inlays/Onlays vs. Fillings: A filling (whether composite resin or amalgam metal) is placed directly into a cavity in one visit. It’s typically best for small to medium cavities. Fillings are quick and inexpensive, but for large cavities they may not hold up as well. Large composite fillings, for example, can crack or wear down, and they might not restore full strength to a heavily damaged tooth. Inlays and onlays, being custom-made, provide a better fit and more strength for bigger cavities. They are much less likely to crack or fall out under chewing pressure because they’re a single solid piece. Also, an indirect restoration can cover areas between teeth or rebuild cusps more effectively than a molded filling. The trade-off is that inlays/onlays cost more and require at least one extra visit (unless same-day) compared to a filling. So, if your decay is minor, a filling is usually sufficient and more economical. But if a filling would be too weak or compromise the tooth, an inlay/onlay is the superior choice to avoid future problems. In short: fillings are for small fixes; inlays/onlays handle bigger jobs with more longevity.
- Inlays/Onlays vs. Crowns: A crown covers the entire tooth above the gum line, whereas an onlay covers one or more cusps and an inlay just the inside portion. Choosing between them depends on how much of the tooth is damaged. Crowns are ideal for extensively damaged teeth – for instance, after a root canal or when a tooth is cracked in multiple places or has very large old fillings. A crown will protect what’s left of the tooth by encasing it, but it requires grinding down the tooth substantially. Onlays (or inlays) are more conservative, used when the damage is moderate. They ”fill in” the tooth’s missing parts without covering the whole tooth. The advantage of an onlay over a crown is you keep more natural tooth, which is generally better for the tooth’s long-term health. Additionally, preparation for a crown can sometimes irritate the tooth’s nerve more due to the larger amount of removal. On the flip side, crowns provide maximum protection – if a tooth is on the verge of breaking apart, a crown holds everything together better than an onlay would. Cost-wise, inlays/onlays and crowns are often in a similar range (depending on material), so the decision is more about tooth condition than price. To put it simply: a crown is like a helmet for a tooth – full coverage – and an onlay is like a patch on the broken part of the helmet. Dentists will choose the least invasive option that will still ensure the tooth is strong. So they might try an onlay if feasible; but if they worry the tooth walls are too weak, they’ll go for a crown.
Another aspect of comparison:
- Longevity: All three (fillings, inlays/onlays, crowns) can last many years, but typically a small filling might last ~5-10 years, a large filling maybe less if it’s heavily loaded, whereas a well-made inlay/onlay can last 10-20 years, and a crown can last 10-15 years or more. Gold restorations (whether inlay or crown) often last the longest. Porcelain and composite inlays last long but are subject to similar lifespan as ceramic crowns.
- Cosmetics: Fillings and inlays/onlays can be tooth-colored; crowns can as well (all-ceramic or porcelain-fused-to-metal). Aesthetically, a porcelain onlay vs a porcelain crown on a front tooth would look the same externally – the difference is what’s happening to the tooth structure underneath. So if cosmetics are a concern and both options are available, you’d lean toward the more conservative (inlay/onlay) to preserve tooth.
- Future Treatment: If a filling fails, you might end up needing an inlay/onlay or crown. If an inlay/onlay fails or the tooth condition worsens, you might need a crown. If a crown fails or gets decay at the margin, sometimes you need a new crown or more complex work. So each step up is a progression. By doing an inlay/onlay when appropriate, you can delay or avoid jumping straight to a crown, which is beneficial.
In summary: Fillings fix small cavities, inlays/onlays fix medium to large cavities or partial damage, and crowns fix very large damage or structurally compromised teeth. They all aim to restore function and appearance, but in different degrees. Your dentist’s recommendation will be based on preserving tooth structure while ensuring the tooth is adequately protected.
Cost Considerations and Insurance Coverage
Cost is an understandable concern when it comes to dental procedures. Inlays and onlays are a bit more specialized than standard fillings, so let’s break down what you might expect:
Typical Costs:
- The cost of an inlay or onlay can vary widely depending on your location, the dentist’s fees, and the material used. On average, dental inlays might range from around \$300 up to \$1,500 per tooth. Dental onlays can be in the ballpark of \$400 to \$1,600 per tooth. These ranges are broad because a small one-surface inlay in a rural area might be a few hundred dollars, whereas a large multi-surface porcelain onlay in a high-cost city could be over a thousand.
- For comparison, a basic filling might cost \$100–\$300, and a crown might cost \$800–\$2,000 or more, depending on materials. So inlays/onlays tend to fall somewhere between a filling and a crown in cost, often closer to the crown side due to the custom fabrication.
- Gold inlays/onlays can be more expensive than porcelain because gold material is costly. Porcelain and composite onlays have similar pricing typically, though some offices might charge a bit more for all-porcelain lab work.
- If same-day CAD/CAM is used, the cost might be similar to lab-made since you’re paying for the convenience and technology. Some dentists might even charge slightly less because there’s no lab fee, but others may have high equipment costs to recoup. It varies.
Factors Affecting Cost:
- The number of surfaces or size of the restoration – an onlay covering most of the tooth will cost more than an inlay covering just one little corner.
- Geographic location – dentists in big cities or regions with higher living costs generally have higher fees than those in small towns.
- Dentist expertise and lab quality – highly experienced dentists or those using top-tier labs may charge more for their quality and precision.
- Material chosen – as noted, gold might cost more; composite inlays could be slightly cheaper than porcelain in some cases (but not always, since they still need lab work).
- Additional procedures – if you needed core buildup or other work along with it, that adds to cost.
Insurance Coverage:
Insurance plans vary, but here are some common scenarios:
- Many dental insurance plans categorize inlays and onlays as a “major restorative service.” This is similar to how they classify crowns. If so, your plan might cover around 50% of the cost (after your deductible), since major services often have 50% coverage. You would pay the remaining out-of-pocket.
- Some plans might consider them a “basic service” (though less common). If by chance your plan treats an inlay like a filling, it could cover 70-80%. It’s important to check your plan details or ask your dental office to do a pre-estimate.
- Insurance usually will only cover inlays/onlays if they are deemed medically necessary (which they are if there’s decay or fracture). They typically won’t cover something considered purely cosmetic.
- One thing to watch: a few insurance plans have a clause called an “alternate benefit” for inlays/onlays. This means if you get an onlay, the insurance might pay as if you got a large filling (cheaper procedure), leaving you to pay the difference. This is because they may argue a filling could have been done (even if that’s not the best treatment). Not all plans do this, but it’s something to ask about. Your dentist can often send information to justify the onlay as necessary.
- If you have a yearly maximum benefit (common in dental plans, e.g., \$1,000-$2,000 per year), a costly procedure like an onlay will use a chunk of it. Plan accordingly if you might have multiple dental needs in one year.
- No Insurance: If you don’t have dental coverage, many offices offer payment plans or accept financing (like CareCredit). Given that inlays/onlays can be a few hundred dollars or more, you might consider those options. Also, discuss with your dentist if a less expensive material or approach is available (for instance, in some cases a large bonded filling could be done as a temporary fix until you can afford the onlay).
Is it worth the cost?
From a health perspective, if your dentist advises an inlay/onlay, it’s because a filling could fail and lead to bigger problems (which would be more expensive, like a crown or root canal later). Investing in the proper restoration now can save you money and trouble in the long run. A well-placed inlay or onlay can last many years, giving you good value over time.
Before proceeding, it’s perfectly fine to ask your dentist for a cost estimate and what your insurance is expected to cover. They can submit a pre-treatment estimate to your insurer to get an idea of the coverage. This way, you won’t be caught off guard by the financial aspect and can plan accordingly.
Common Myths and Misconceptions About Inlays and Onlays
Dental inlays and onlays are not as commonly talked about as fillings or crowns, so it’s natural that patients might have some misconceptions. Let’s debunk a few common myths:
- Myth 1: “If a cavity is big, I’ll definitely need a crown.”
Fact: Not always. Inlays and onlays exist specifically to handle medium-to-large cavities without immediately jumping to a crown. Many people assume only a tiny cavity gets a filling and anything bigger means a crown. In reality, dentists often use inlays/onlays to conservatively restore a tooth and avoid the extra tooth reduction a crown would require. Only if the damage is extensive or the tooth is too weak will a crown be the go-to. So, a big cavity doesn’t automatically equal a crown – partial restorations might do the job. - Myth 2: “Inlays and onlays are old-fashioned because they were done in gold.”
Fact: While it’s true that traditionally many inlays/onlays were made of gold (and gold is still an excellent material), modern dentistry has advanced tooth-colored options. Today, porcelain inlays and onlays are very common and in high demand because they look just like your tooth. Even high-strength composite resin can be used. So, the technique is not outdated – it’s evolved. If you don’t want gold in your mouth, you have aesthetic alternatives that still offer great strength. - Myth 3: “Getting an inlay or onlay will hurt a lot or be worse than a filling.”
Fact: The procedure for an inlay/onlay is virtually the same experience as getting a filling or crown. You’ll be numbed, you won’t feel pain during the process, and the post-op discomfort is minimal. Some people fear that because it involves impressions and a temporary, it must be more painful or complicated – but it’s really not. There’s no significant pain involved thanks to anesthesia. If you can handle a filling, you can handle an inlay or onlay just fine. - Myth 4: “Inlays/onlays won’t last and I’ll end up needing a crown anyway.”
Fact: Inlays and onlays are very durable and can last a long time – often 10-20 years or more, as noted earlier. Nothing in dentistry is guaranteed forever, and yes, eventually any restoration might need replacement. However, it’s not a given that an onlay will fail quickly or that a crown will inevitably be needed. In fact, by preserving more of your tooth, an onlay could keep the tooth healthier longer. Many patients have inlays or onlays that have functioned perfectly for decades. Good oral care and not abusing the tooth (chewing super hard items) will maximize their lifespan. They are considered a permanent treatment, not just a temporary stopgap. - Myth 5: “Insurance won’t cover inlays or onlays, or they are too expensive to consider.”
Fact: Insurance coverage for inlays and onlays can vary, but many plans do cover them, often at a similar rate as crowns (around 50% after deductible, if they are considered major services). It’s worth checking your plan. While they are more expensive than fillings, they are generally comparable in cost to crowns. Additionally, the long-term benefits (preventing more serious damage) can justify the cost. Most dentists will work with you on payment options. Don’t let assumptions about cost stop you from discussing this treatment – you might be surprised what your insurance will do, and the dentist can advise you on the financial aspect.
By understanding the facts behind these misconceptions, you can make a more informed decision. Inlays and onlays are proven, effective treatments – not experimental or rare. If your dentist suggests one, it’s because it’s truly the right fit for your dental problem, balancing conservation of your tooth with the need for strength and durability.